Hi Guys, Today I am Going to Tell you How to Add a Border or Draw Four Side Margins in Microsoft Word Easily?
If You are Looking for “How to Put a 4 Side Margin Microsoft Word?” (or) “How to Add a Border in Word?”.
You are at the Right Place to Get Your Answers & Solve the Issue/Error.
Microsoft Office is a software which was developed by Microsoft in 1988. Microsoft Office is a Collection of Productivity applications that are designed mainly for business purposes. It is Microsoft’s Most Important product. Microsoft Office is the Most Used Office Application in the world and it is widely used for personal and professional purposes. Microsoft Office provides Apps and services like Microsoft Word. Microsoft Excel, Microsoft Powerpoint, Microsoft Onenote, and Microsoft Outlook. Microsoft Office is available in 35 different languages and is supported by Windows, Mac, and Linux.In Microsoft Office, Microsoft Word Plays a Huge Role Since MS Word is one of the most used programs of the Office Suite. Microsoft Word is Mainly used to make High-Quality Professional documents, Formal and Informal letters, Creating Reports, and Much More. It has many advanced features like formatting and editing, Spell Checking and More. In Education and Workplace, Microsoft Office Plays a Major Role and is also considered as one of the simplest tools for Office Workers, teachers, and students.
Students Can Use Microsoft Word for Note Making, Projects, and Assignments, and also can be used for Resume Making Purposes. We all do a lot of Office Work in Microsoft Office. Each and Every PC has this application Installed for sure. Most of the Office Works Needs Microsoft Word to be Installed on your PC. Because Office works like creating reports, bills require Word. Word is very helpful For Personal Uses too Like Making Notes while Studying or Creating a Document for Seminars Purposes, Making Professional Resumes. If you’re a person who is looking to Create a Professional Document, then we first look for the Four Side Margin. The Four Side Margin Gives a Premium Look to the Whole Document and it Looks Very Clean and Stylish. You can also Choose the Types of Borders/Margins on Microsoft Word which Depends on your Needs. If you don’t know the proper way to add a four-side margin or Border to your document then just follow our Guide Given Below.
Let’s See it Below.
Check Out This: How to Update/Clear Google Amp Cache?
Steps for How to Add a Border or Draw Four Side Margins in Microsoft Word Easily?
Step 1: First of all, Double-click the Word document on which you want to add borders. If you are not created your Word document, Open Microsoft Word and Create a New Blank Document.
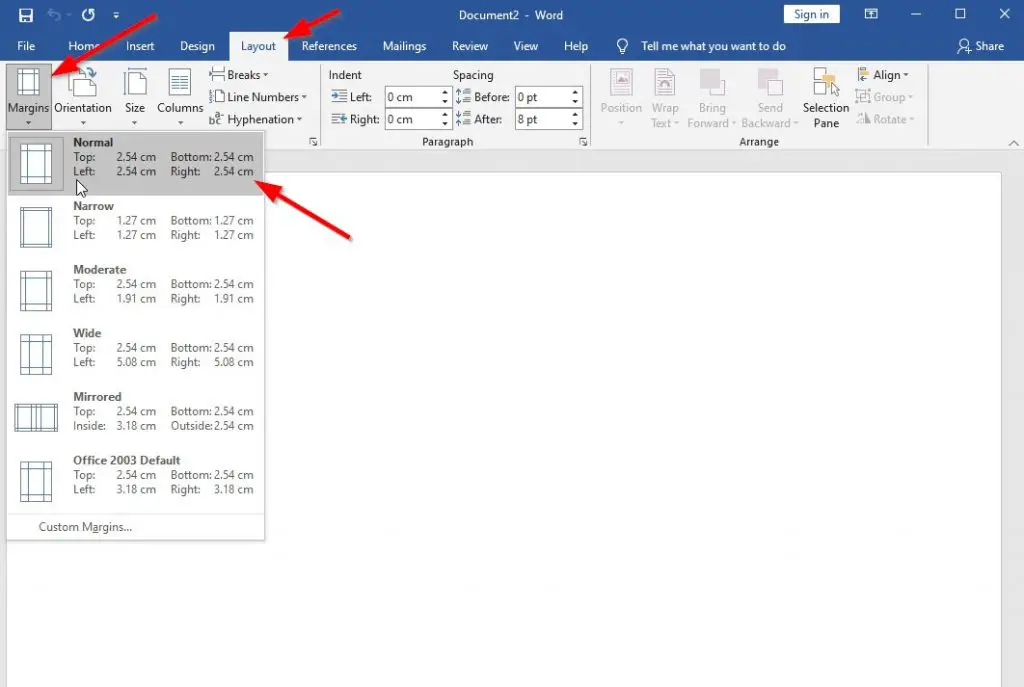
Step 2: Navigate to Layout Tab and Click Margin Option and You can See Lot of Margin Types Just Select the Normal Margin Type or Any other Margin type as Per your Needs.
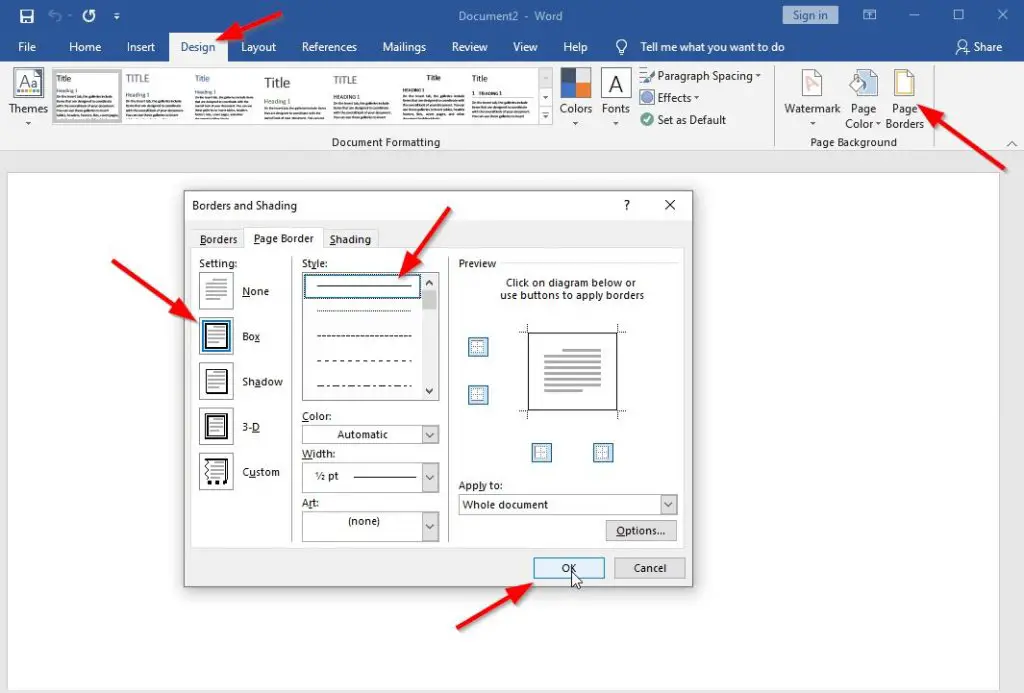
Step 3: Now Navigate to Design Tab and Click Page Borders Option.
Step 4: Navigate to Settings Option and Select Box and then select the Border Line Style and Width and then Click Ok.
You can also Adjust the Page Borders Types and Shading Options further as per your satisfaction.
If you wish to remove the page borders, Just Follow the Above Same Procedure.
Step 1: Open Design Tab and Click Page Borders Option.
Step 2: On the Page Border tab, Just Select the None Options under Settings and Press OK.
After Pressing the OK Button, Your border should be removed.
That’s It! You’re Done Man!
That’s All About this Post. Give Your Reviews / Reactions about this Post and Leave Comments, Ask Your Doubts, We are here to Help You!


