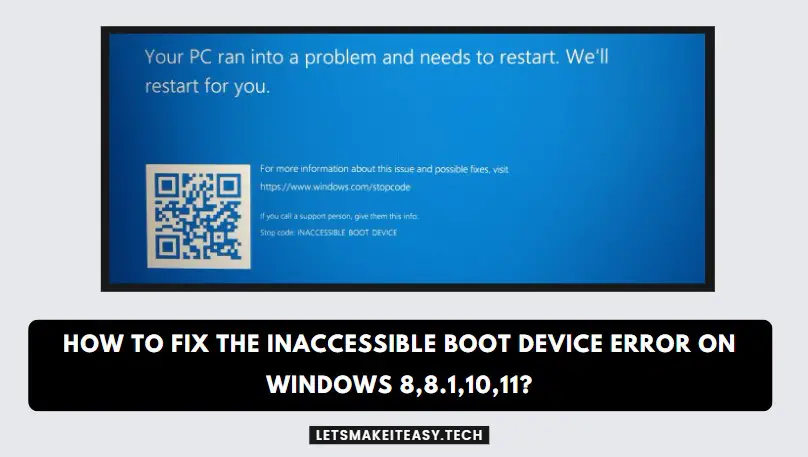
Hi Guys, Today I am Going to tell you How to Fix the Inaccessible Boot Device Error on Windows 8,8.1,10,11?
Popular Right Now: How to Bypass Windows 11 TPM 2.0 and Secure Boot,CPU & RAM (Minimum System Requirements)?
If you are Looking for “How to Fix the Blue Screen of Death Inaccessible Boot Device Error on Windows 11?” (or) “How to Fix an INACCESSIBLE BOOT DEVICE BSOD?”.This Post will help you for sure.
The “INACCESSIBLE_BOOT_DEVICE” error is a Blue Screen of Death (BSOD) error that usually occurs in Windows operating systems. We all face this issue many times on our Windows PC. Generally, There are a lot of things in which the Blue Screen of Death Errors. This BSOD Error (Stop code: Inaccessible Boot Device) indicates that the system is not capable of accessing the boot device, such as the hard drive or SSD. There are some other factors that cause BSOD Errors. Some of them are Outdated SATA Drivers, Outdated Graphics Drivers, Corrupted or Damaged System Files and also Damaged or Dead Hard Drives, SSD.
The Easiest Way to Fix this Issue is to Restart the Device (or) Turn Off the PC & Wait for 1-2 Min and then Turn it On. The Other Solution is to Check the Hardware Components, especially the Cables that are connecting your Booting Device (HDD, SSD). And also Check External Hard Drives, and SSDs are Properly Connected to the Motherboards. You can also use System Restore if it is available. This Error “INACCESSIBLE_BOOT_DEVICE” Could be Easily Fixed. There are a lot of Methods available to Identify and Fix BSOD Errors. If You’re Facing this Issue Dont Worry We are here to Help You. Just Follow our Methods Carefully.
Solution For How to Fix the Inaccessible Boot Device Error on Windows 8,8.1,10,11?
Method 1: Enable AHCI (Advanced Host Controller Interface) Mode in BIOS
Step 1: First of all, Restart your PC and Open the BIOS Setup by using the BIOS Menu Key Some of the Common BIOS keys are F2, F10, F12, Del, or Esc. BIOS Menu Key won’t be the same it will vary with different motherboards.
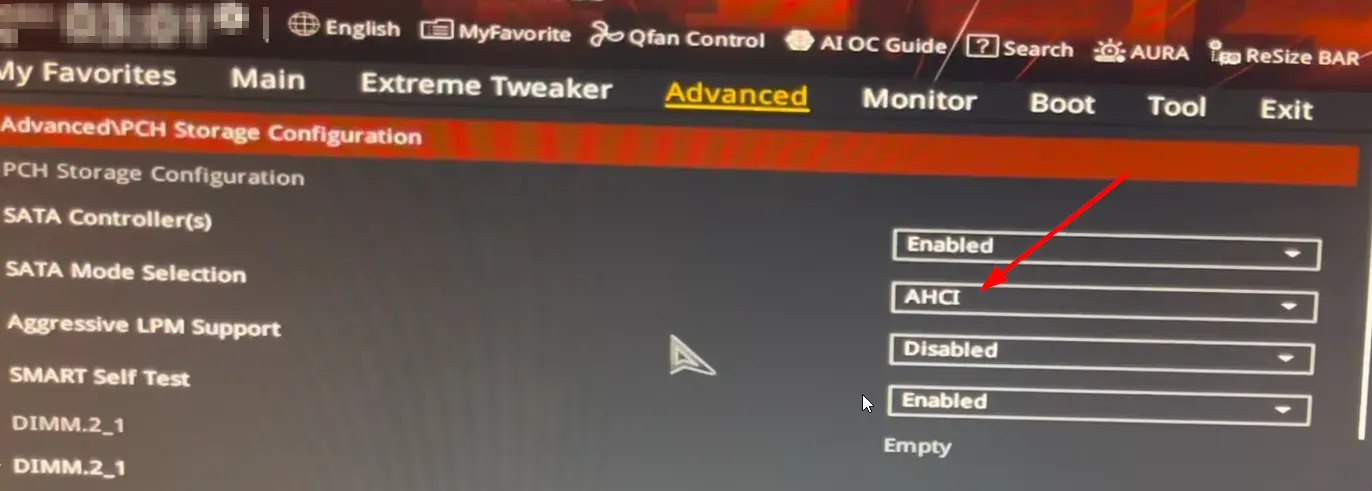
Step 2: Now Open the Advanced Mode & Navigate to Advanced Tab & Look for the SATA Configuration and Click on it.
Step 3: Under SATA Configuration, You can see the SATA Mode Selection Option. Now you need to select the AHCI (Advanced Host Controller Interface) Mode & Save the Configuration and Restart the PC.
(Or)
Step 3: Open the BIOS Menu and Navigate to the Main Tab & You Can see the SATA Mode. Now You Need to Set the SATA Mode as AHCI Mode & Save the Configuration and Restart the PC.
Method 2: Uninstall the Recently Installed Updates
Step 1: First Of all, If You are Able to Boot into Login Screen then Press and Hold the Shift key & Click the Power Button Icon on the Bottom of the Screen, and Select Restart Option. Now Your Windows 11 will Restart and You Will See the Startup Repair Menu.
(Or)
Step 1: If you can not boot into your system, Login Screen, then You Need to Use the Automatic repair Option. In Order to Run the Automatic Repair, You Need Shutdown the PC and Press the Power Button to Turn ON the PC & Now When You See the Manufacturer Logo, You need to Press and Hold the Power Button for at least 4-5 Seconds until the PC Gets Shutdown. Repeat this same process for 3 Times. Now the Automatic Repair Mode will be activated and the automatic Screen Will Appear. Wait for the Diagnosing Process to Complete and Now You Will See the Startup Repair Menu.
Step 2: On the Startup/Automatic Repair Screen, You Need to Select Advanced Options and You will see the Choose a Option Screen.
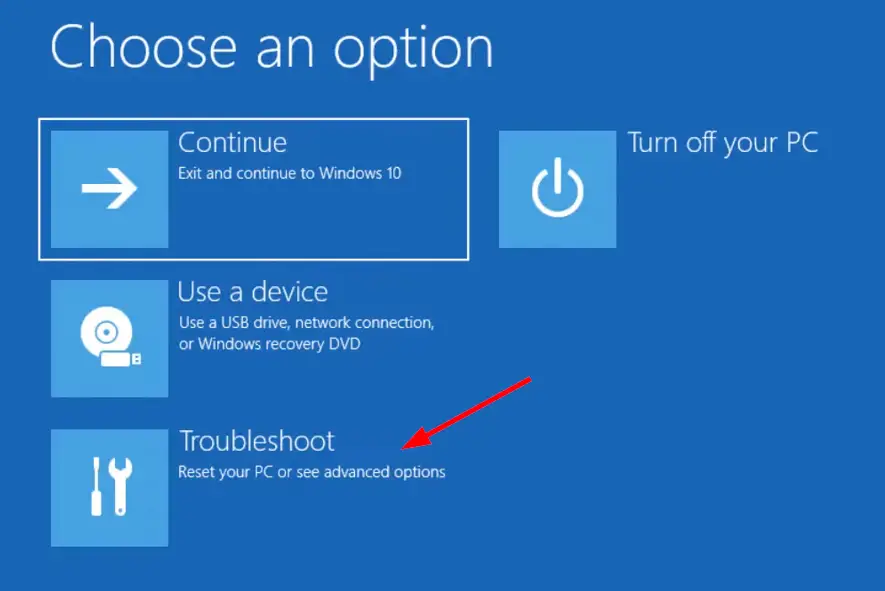
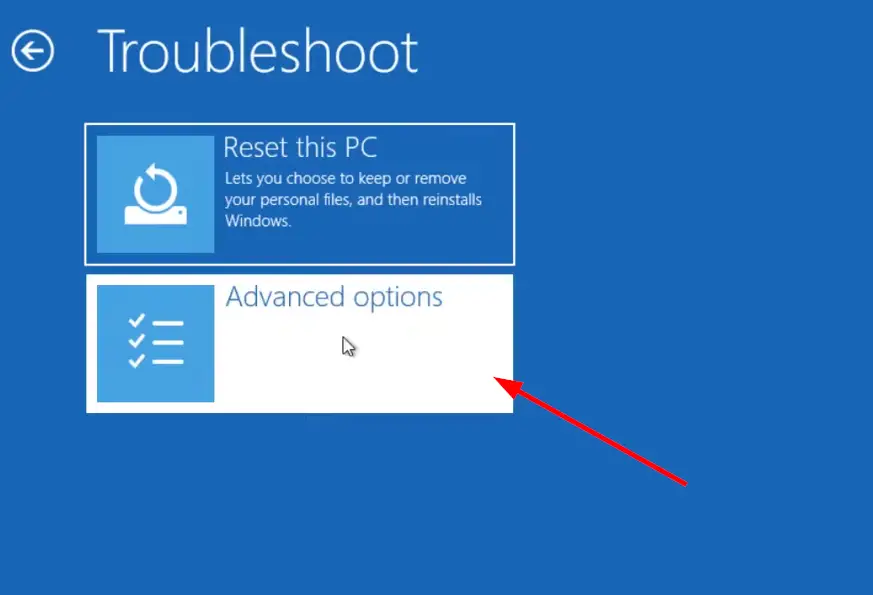
Step 3: On Choose an Option Screen, You Need to Select the Troubleshoot Option and Again Select the Advanced Options Under Troubleshoot Options.
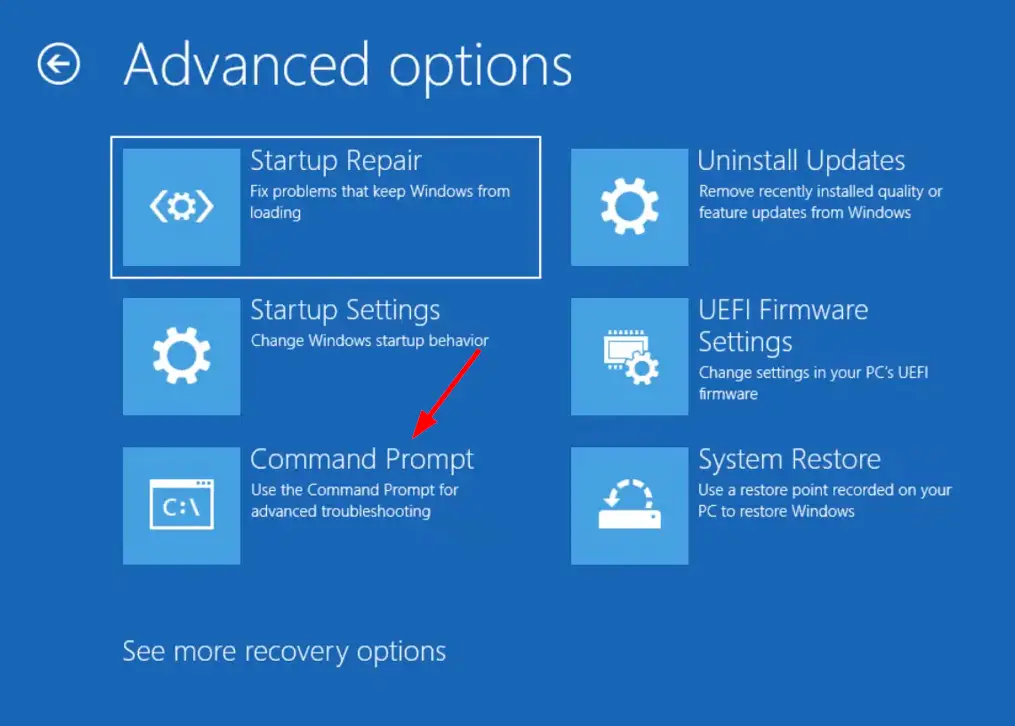
Step 4: On the Advanced Options Screen, You can see a lot of options.Now Just Click on the Command Prompt.
Step 5: A New Command Prompt Window will appear, You Need to Enter the Following Commands One by One.
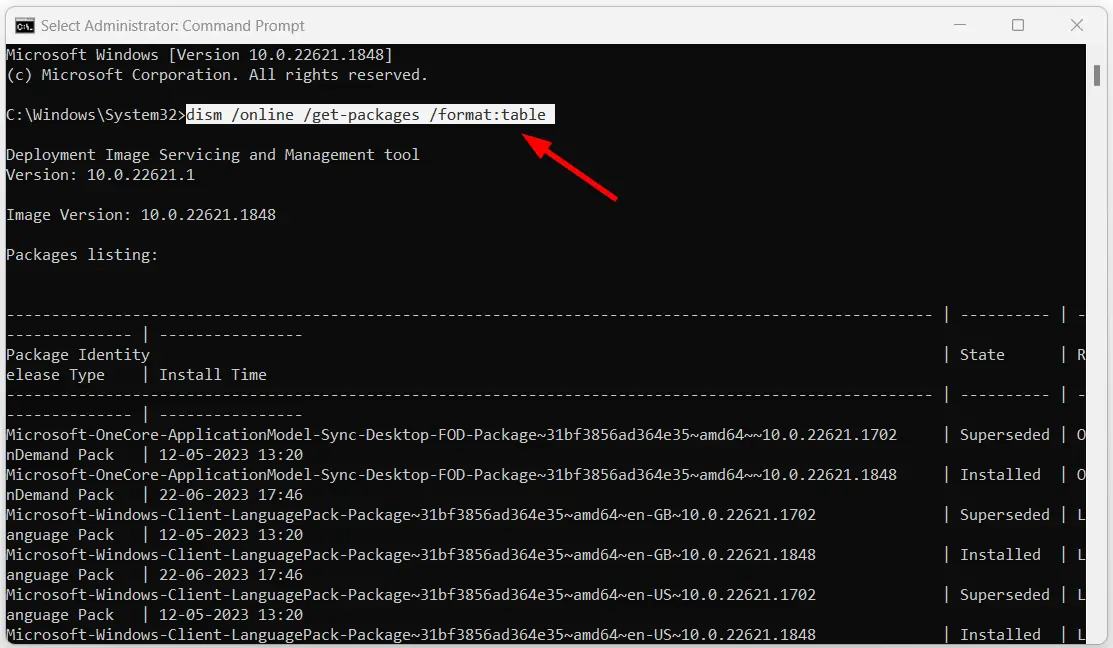
dism /online /get-packages /format:table
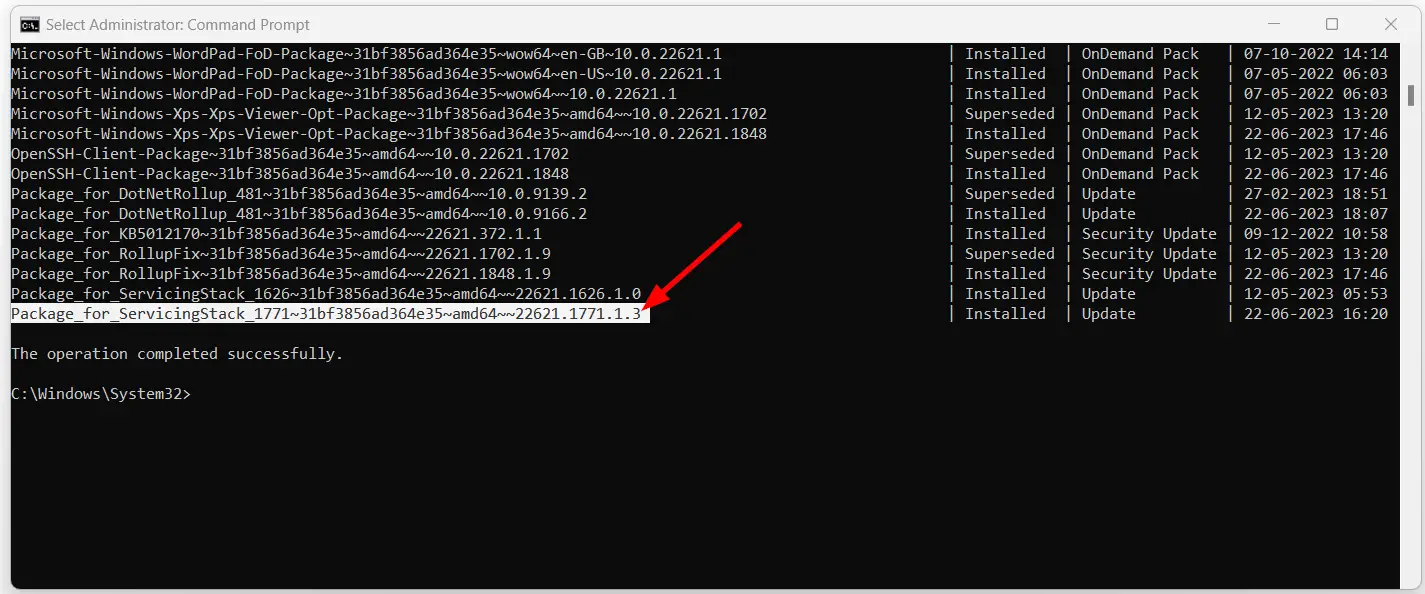
The First Command “dism /online /get-packages /format:table” will show you the Latest Installed Updates in table format.You Can Easily find the Recently Installed with the help of the Install Time Column on the table.
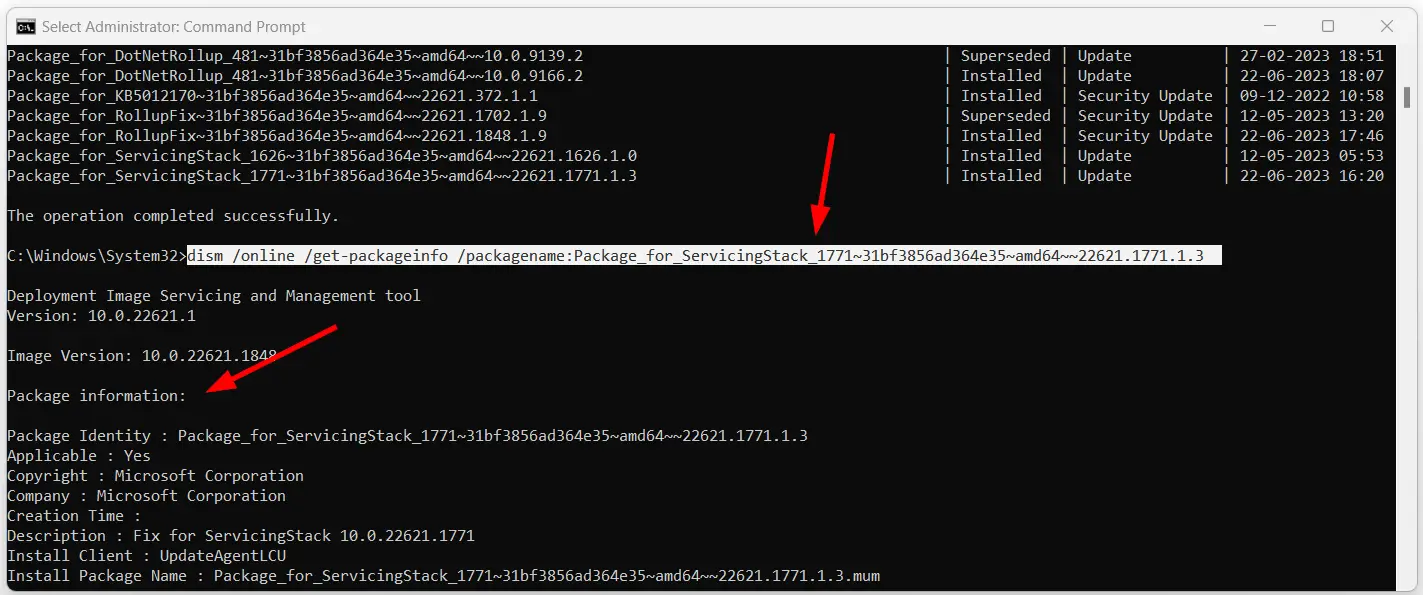
Step 6: If you want to see the More Details of the package you should use this command before going to removing steps. Now You Need to Look for the Recently Installed Updates Under the Package Identity Column and Just Copy the Package name and paste it into a Notepad.
Now Enter the following command and Replace the [PackageName] with the Name of the Package that you’ve already copy pasted in Notepad.
dism /online /get-packageinfo /packagename:[PackageName]
For Example – If the recently installed package name is Package_for_ServicingStack_1771~31bf3856ad364e35~amd64~~22621.1771.1.3
then
You Need to Enter dism /online /get-packageinfo /packagename:Package_for_ServicingStack_1771~31bf3856ad364e35~amd64~~22621.1771.1.3 and Press Enter.
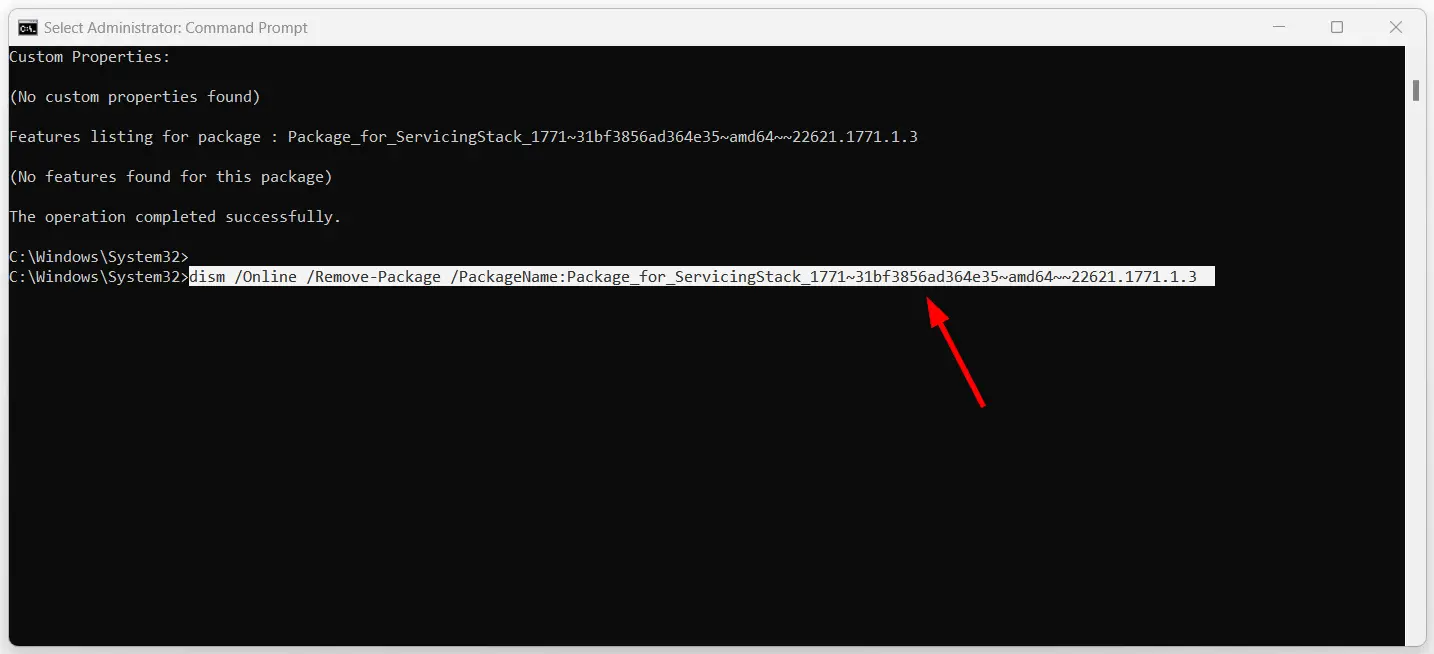
Step 7: If You’re Ready to Remove the Recently Installed Package then Type this Below Command and Press Enter.
dism /Online /Remove-Package /PackageName:[PackageName]
For Example – If the recently installed package name is Package_for_ServicingStack_1771~31bf3856ad364e35~amd64~~22621.1771.1.3
then
You Need to Enter dism /Online /Remove-Package /PackageName:Package_for_ServicingStack_1771~31bf3856ad364e35~amd64~~22621.1771.1.3 and Press Enter.
*Important Note- You Need to Replace the [PackageName] With with the name of the Recently Installed update that you noted on the list.
Method 3: Update the IDE ATA/SATA Controller Drivers to Latest Version
Step 1: Restart Your PC and Now You Need to Boot into the Safe Mode (or) Enable the Safe Mode using Startup Settings.
Step 2: After Entering into the Safe Mode, Righ Click on the My Computer and Select the Manage Option to Open Computer Management Console.
Step 3: On Computer Management Console, You Can See the System Tools on the Right pane. Under System Tools, You Can Find the Device Manager and Just Click on it.
Step 4: Now Look for the IDE ATA/SATA Controller Drivers on the left pane and click on it & Now You can see the Standard SATA AHCI Controller.
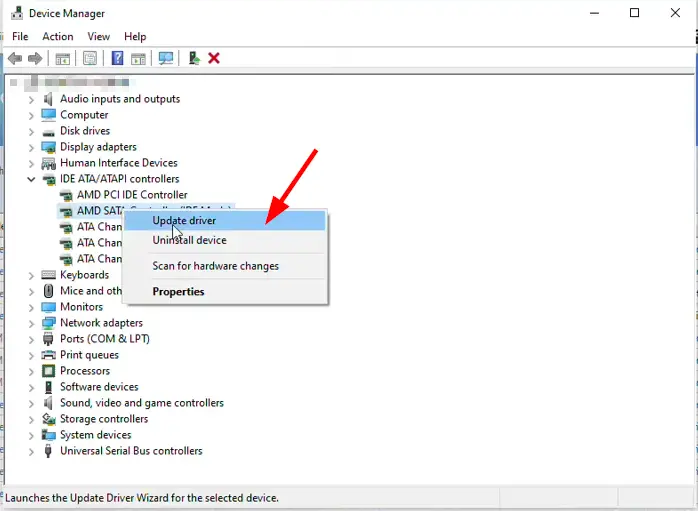
Step 5: You Need to Right Click on the Standard SATA AHCI Controller and Click Update Driver Option.
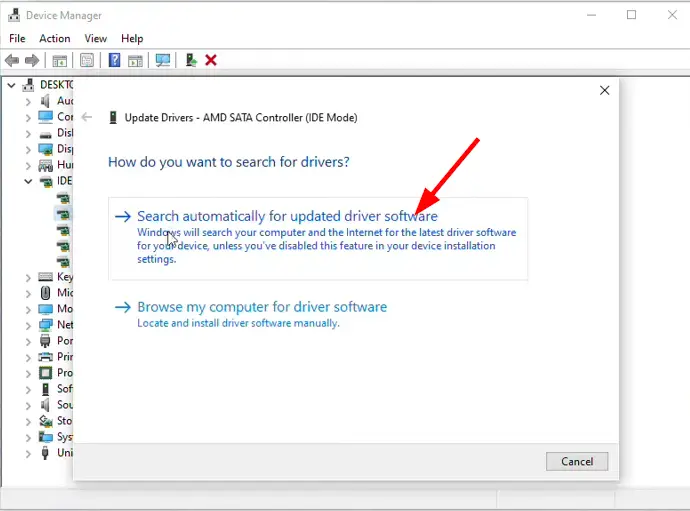
Step 6: Now You Can either Select the “Search Automatically for Drivers” Option or “Browse my computer for Drivers” Option.
1. Search Automatically for Drivers – This Option Will Find the Latest Drivers and Install them Automatically.
2. Browse my computer for Drivers – If You Know the manufacturer of the Devices that you use, then You Can visit the Manufacturer’s Website and Download the Latest Drivers and Update it Manually
Now Restart the PC After Installing the latest Drivers and Check whether the Error Appears or not.
Method 4: Run the System File Checker (SFC) Scan
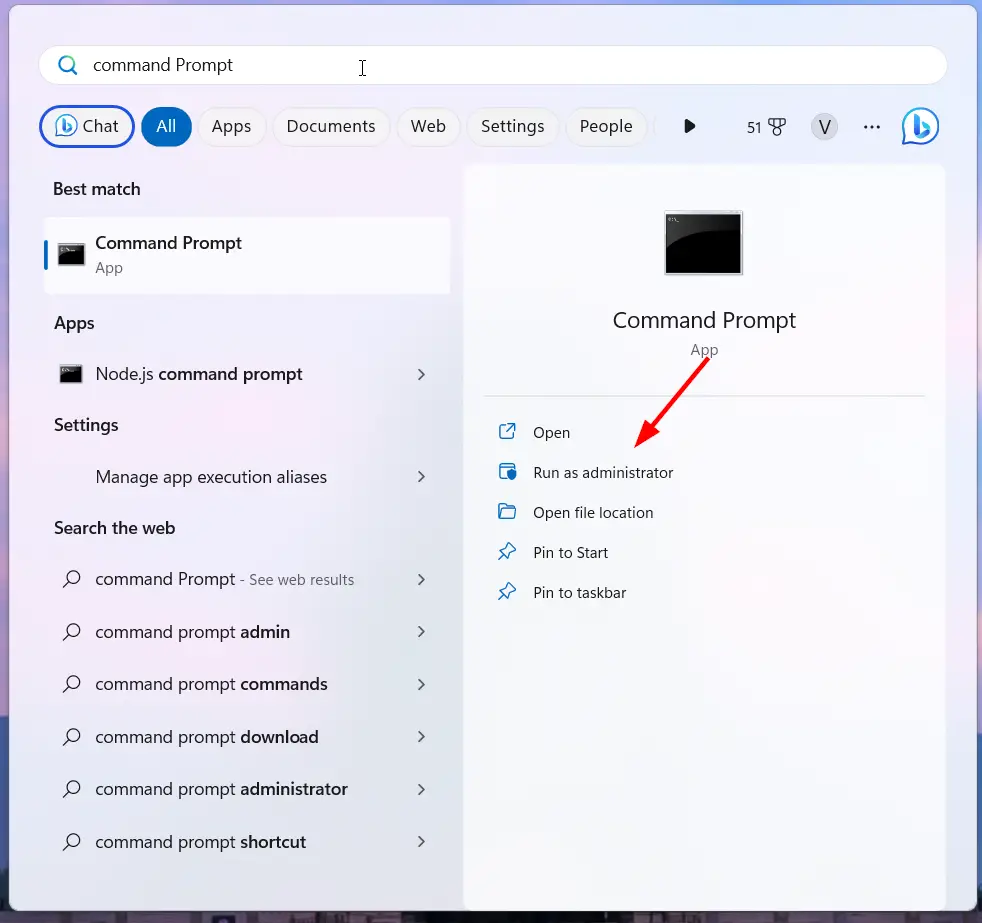
Step 1: To Run a System File Checker (SFC), Goto Search and Type Command Prompt & Run it as Administrator.
(or)
Step 1: Goto Search and Type Run and Open the Run Program (or) Press Windows + R keys to Open the RUN Program. On the Run Dialog Box, Type cmd and press Ctrl + Shift + Enter to open Command Prompt with administrative rights.
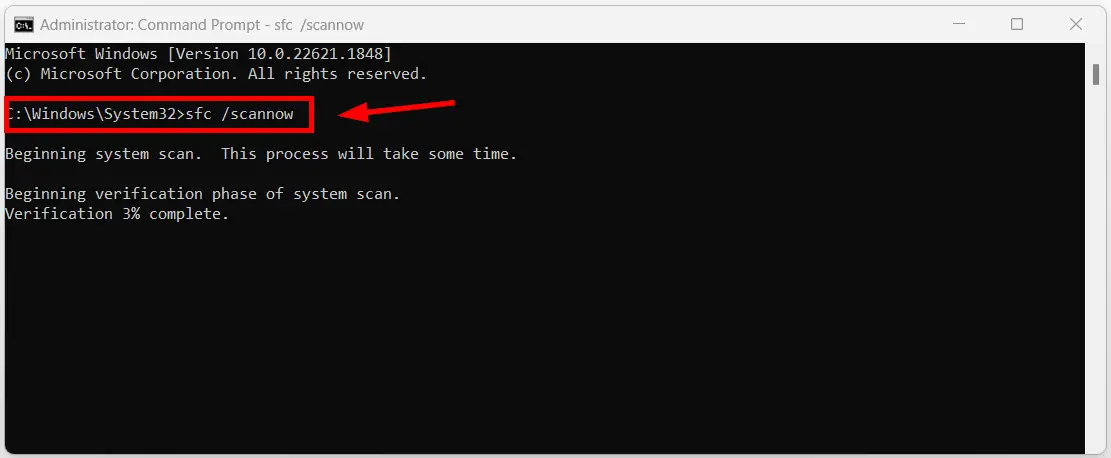
Step 2: On the Command Prompt Window, Type the following command and Press the Enter Button to Begin the Scan Process.
sfc /scannow
Step 3: Wait for the Scan Process to Complete, It will Take 5-10 Minutes to Complete. This System File Checker Scan will Look for Corrupted files and Fix the broken or corrupted files Automatically. Now You Can check whether the Error” “Inaccessible Boot Device” is appearing or not.
Method 5: Run the Deployment Image Servicing and Management (DISM) Scan
Step 1: To Run a Deployment Image Servicing and Management (DISM) Scan, Goto Search and Type Command Prompt & Run it as Administrator.
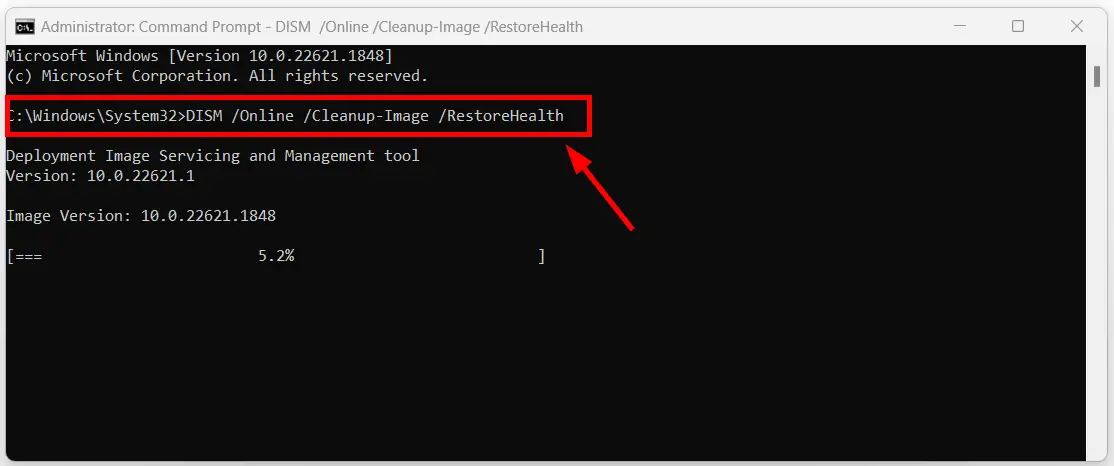
Step 2: A New Administrator: Command Prompt Window will appear, Now type the following command and Hit the Enter Button to Begin the Scan Process.
DISM /Online /Cleanup-Image /RestoreHealth
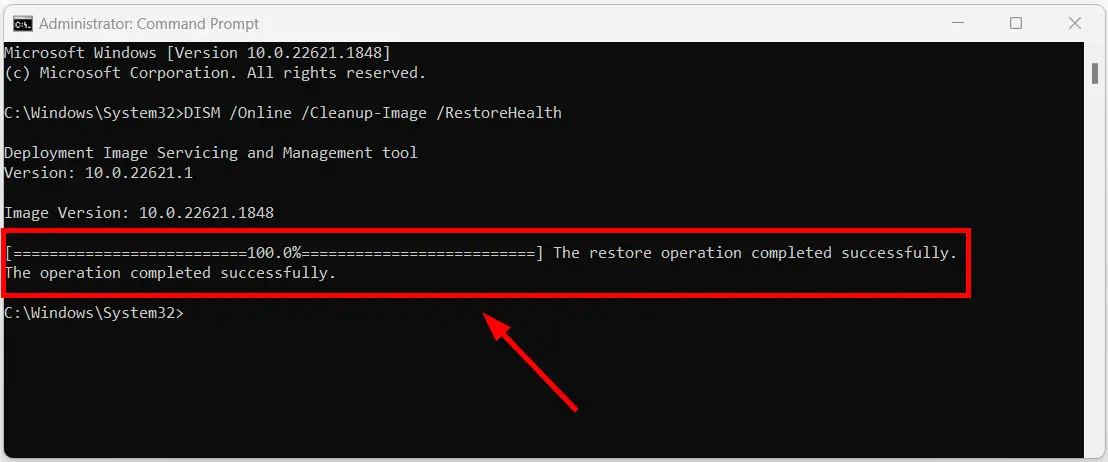
Step 3: It usually takes 8-10 Minutes to Complete. Wait for the DISM Scan Process to Complete. When the DISM Scan Gets Completed It will Fix the Error” “Inaccessible Boot Device”.
Method 6: Run the Check Disk (CHKDSK) Scan
Step 1: To Run a Check Disk (CHKDSK) Scan, Goto Search & Type Command Prompt & Run it as Administrator.
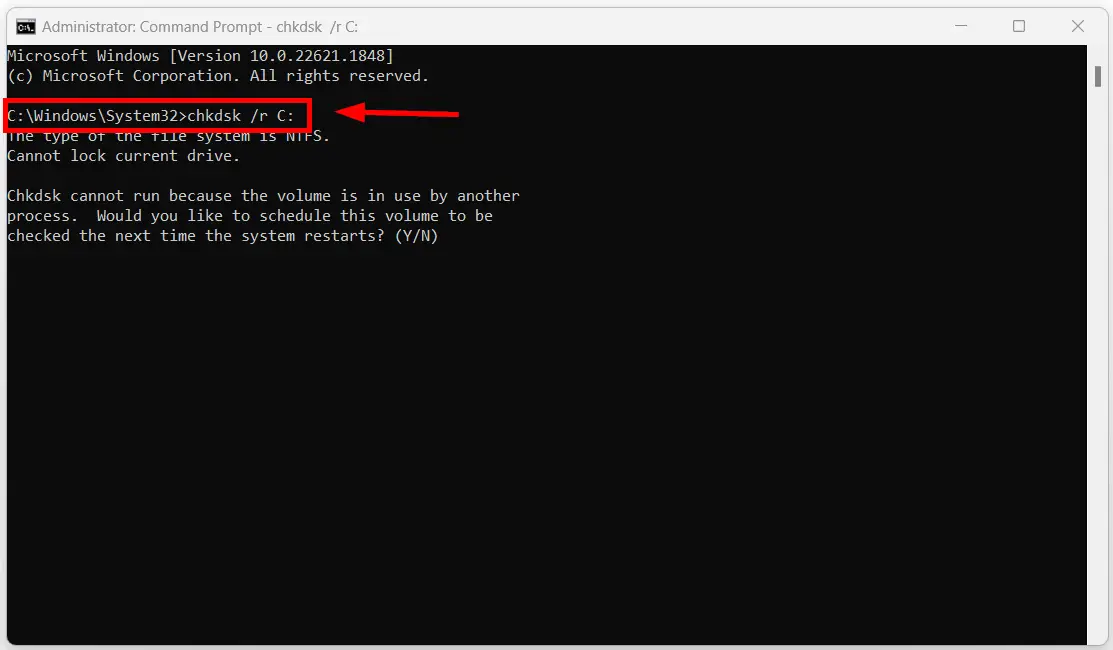
Step 2: On the Command Prompt Window, Type the following command and Hit the Enter Button to Begin the Check Disk Scan Process.
chkdsk /r C:
*Note – This CHKDSK Scan Will Check the System Drives for errors, and broken & corrupted files and also Fix the Corrupt files on the system drives.
Step 3: Now After You Press Enter Key, You Will the Message “Cannot Lock Current Drive”, which means the command will not be executed on the current running pc. So You need to Schedule the Check Disk Scan to the next restart.
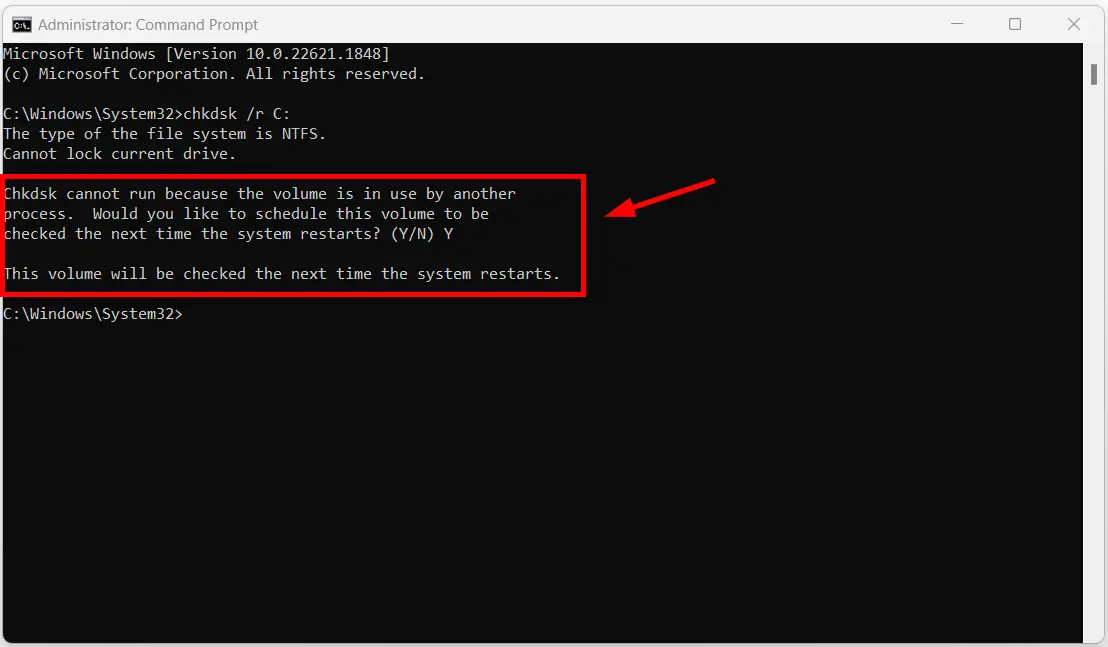
Step 4: Now you need to Press the “Y” Key to Confirm the Schedule Process. Now you can see the “This Volume will be Checked Next Time the System Restarts”.Restart the PC and Now the Error” “Inaccessible Boot Device” will be fixed If the issue appears due to a corrupt drive.
Method 7: Reset the Windows 11 PC
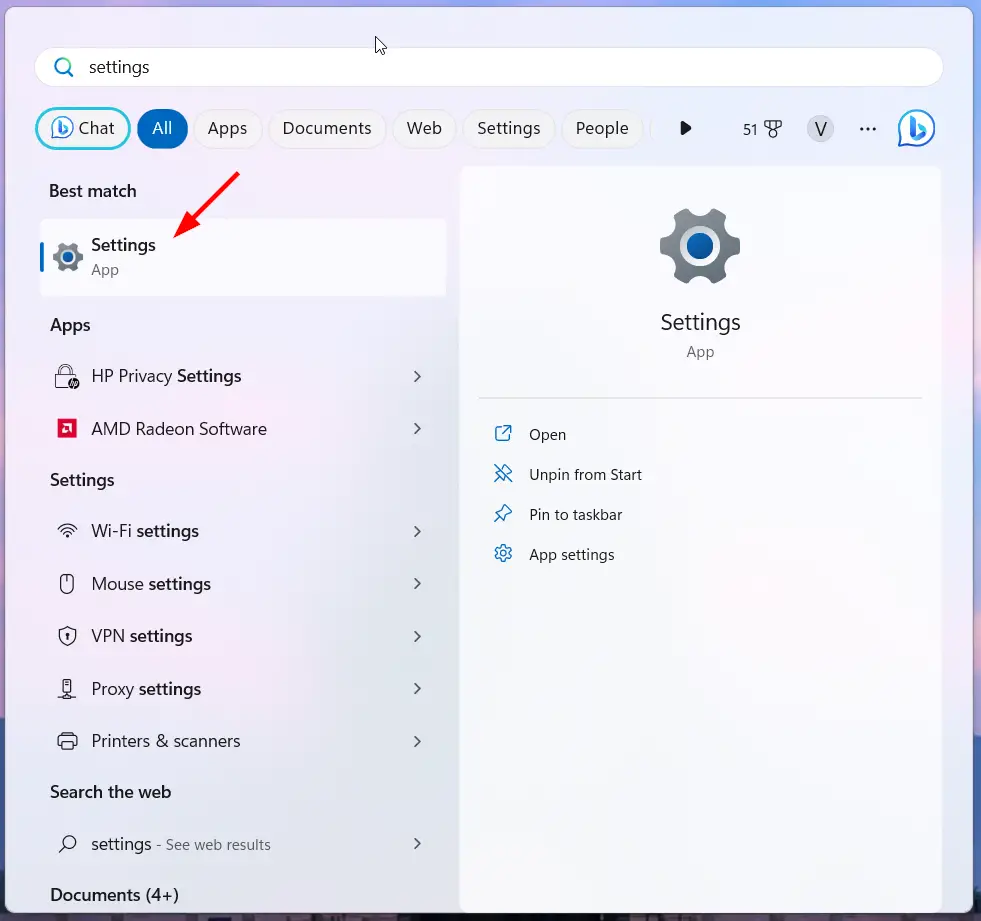
Step 1: Goto Search and Type Settings and Open the Settings (or) Press Windows + I Key to open the Settings.
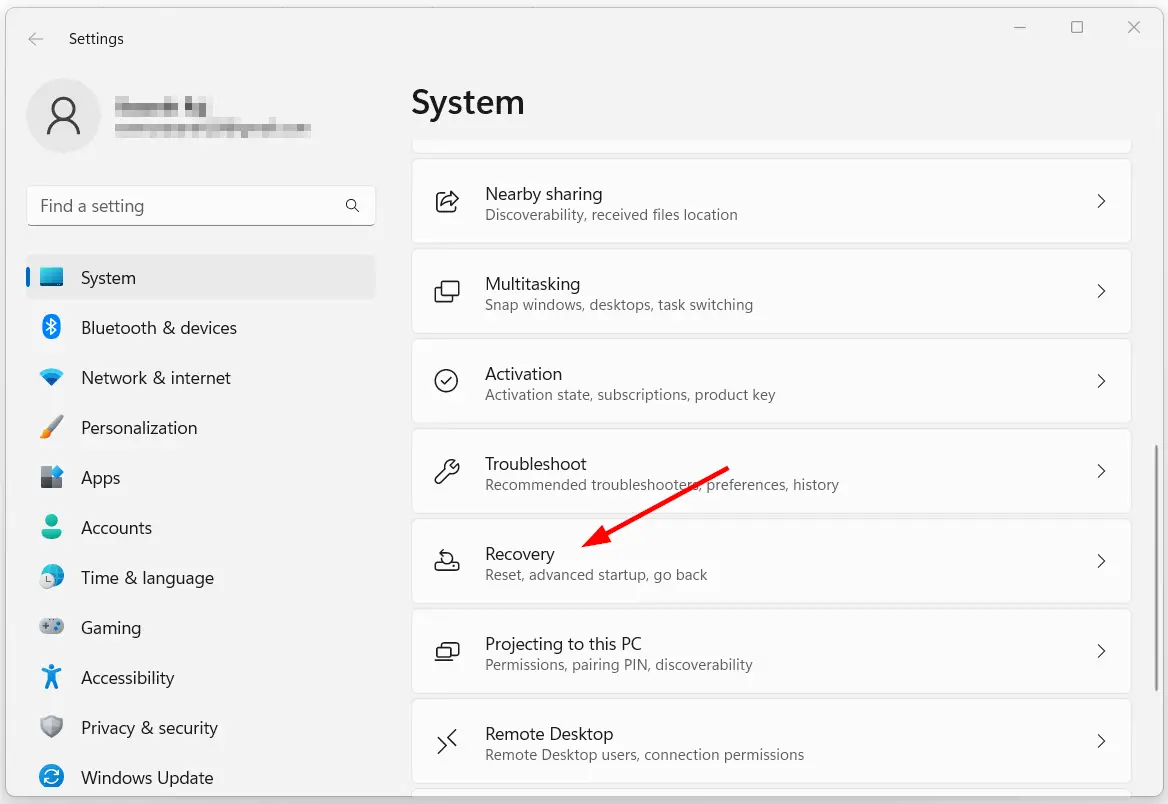
Step 2: Navigate to System Tab, Scroll Down to Recovery Options and Click on it to Open the Recovery Options.
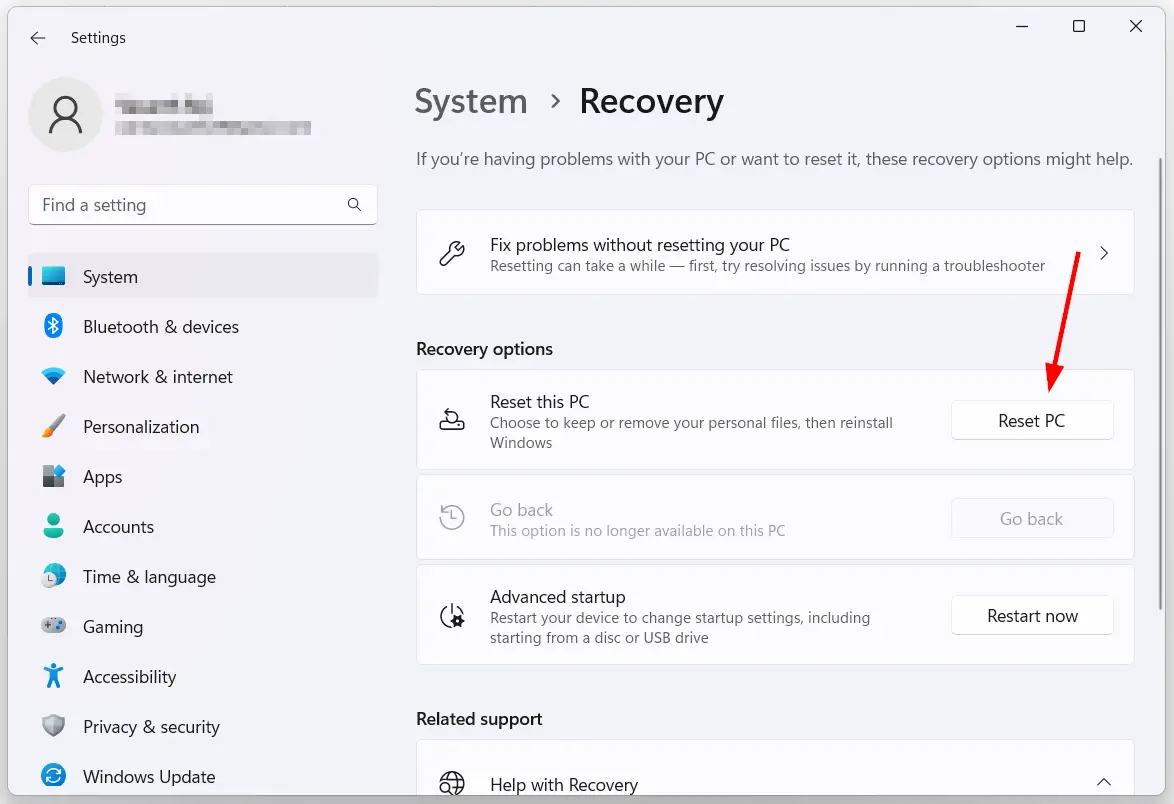
Step 3: Under Recovery Section, You can See the Reset this PC Option. Just Click on the Reset PC Button to Start the Reset Process.
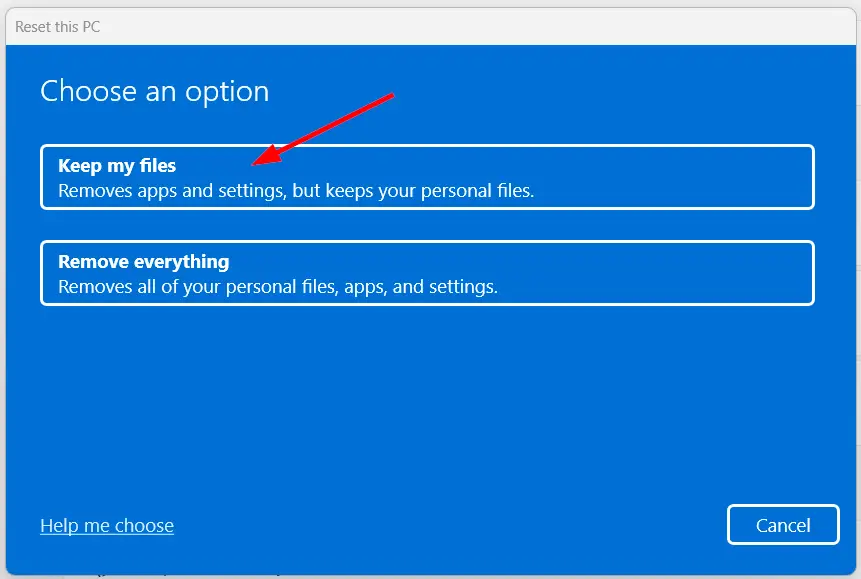
Step 4: A New Reset this PC Window Will Appear, Now You need to Select the “Keep My Files” Option.
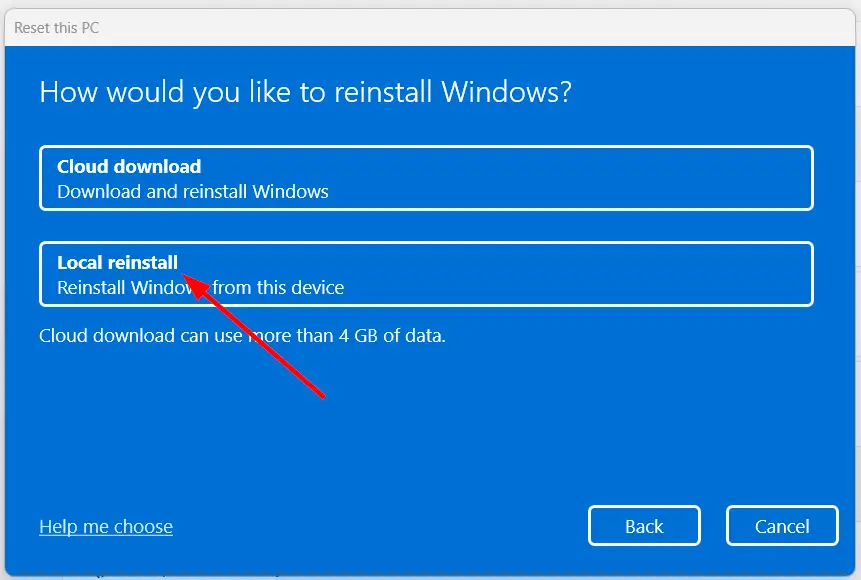
Step 5: On How Would you like to reinstall window, You can Choose any one Option from this two options either Cloud Download or Local Reinstall.
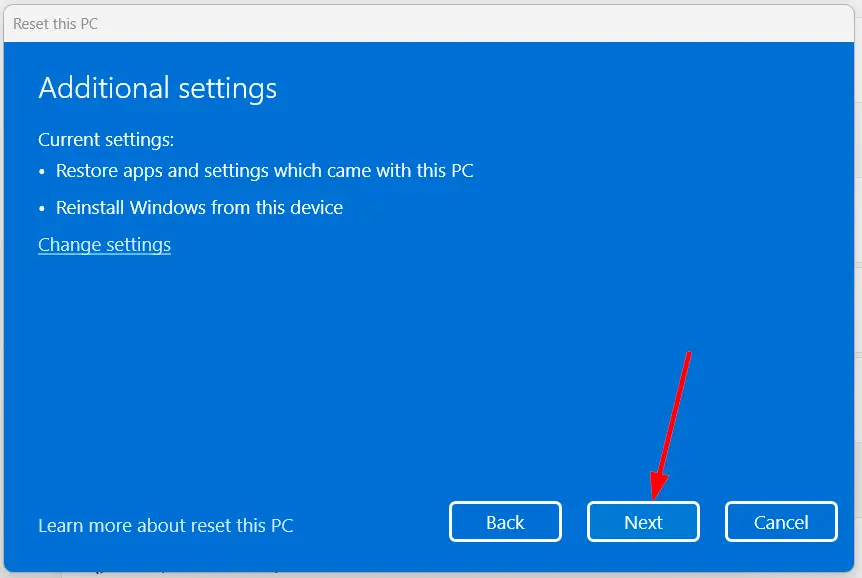
Step 6: On the Additional Settings Window, Click on the Change Settings Button to Change the Settings that you previously selected.Now Press the Next Button.
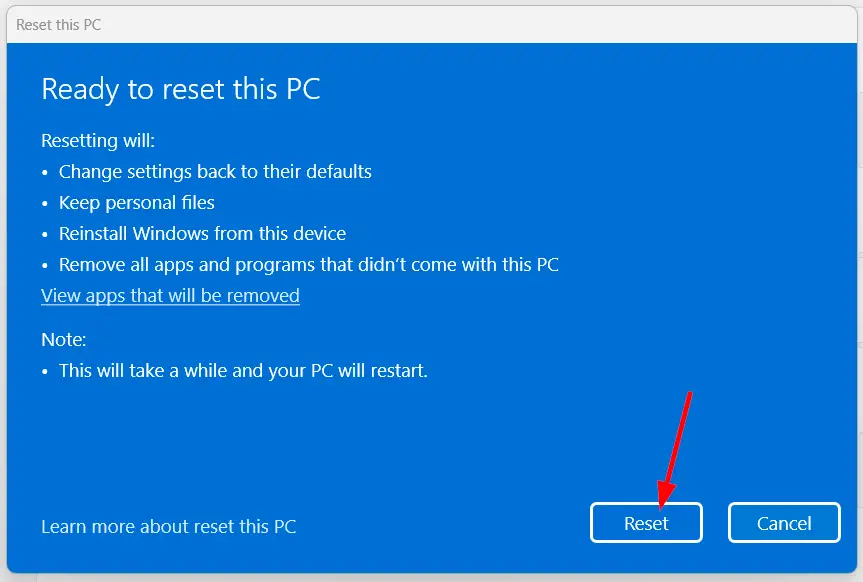
Step 7: Now the Ready to Reset this PC Window will appear, You need to Click the Reset Button to Start the Reset Process. Your System May be Restarted Several Times which is Normal.And Note that the installation times may vary which is completely based on the system configurations.
After Resetting the PC, The Error” “Inaccessible Boot Device” Will be Fixed and Now you’re Ready to use your PC.
That’s All About this Post. Give Your Reviews / Reactions about this Post and Leave Comments, Ask Your Doubts, We are here to Help You!


