Hi Guys, Today I am Going to Show You How to Fix the “The PC must support TPM 2.0” Error While Installing Windows 11?
If You are Looking for “How to Fix The PC must support TPM 2.0?” (or) “How to Fix The PC must support Secure Boot?”. This Post is Specially Made for you.
Microsoft Released its latest Operating system Windows 11 on 5 October 2021. Microsoft Announces that Windows 11 will be available as a free upgrade to Eligible Windows 10 users. The Most Important System Requirements for installing Windows 11 are Trusted Platform Module (TPM) version 2.0 and Secure Boot. Windows 11 Offers a modern, user-friendly experience and Provides Improved performances in gaming, and productivity. If You want to Install Windows 11, then you can download it from the official website. (or) If you are a Windows 10 User then You can Upgrade it through the free upgrade option too. So, To Check if your PC is available for the free upgrade, You can use the PC Health Check App which is available on the official Windows site. If You are Using a PC that is not supported then you may face the error “This PC Can’t Run Windows 11. This PC doesn’t meet the Minimum System Requirements”.
This Error “How to Fix “The PC must support TPM 2.0 & Secure Boot Error” usually occurs when your system doesn’t have the Support for TPM 2.0 and Secure Boot (or) TPM 2.0 & Secure Boot Features May be Disabled by Default. So, Enabling these Options would fix the error easily. If You are using a PC That doesn’t support the TPM & Secure Boot features then you may need to bypass the TPM, Secure boot Options to Install Windows 11 on your unsupported PC. First Thing that you must Know Before Entering into the bypassing methods. Microsoft Officially Announced that Bypassing & Installing Windows 11 on an Unsupported PC will Result in compatibility issues. Microsoft Mentioned that the Damages that happen to that type of PC will not come under the manufacturer’s warranty. So, If you are ready to install Windows 11 on an unsupported PC then You need to follow our tutorial carefully.
Popular Right Now: How to Fix “This PC Can’t Run Windows 11” Problem Easily?
Solutions for How to Fix “The PC must support TPM 2.0” Error While Installing Windows 11?
Method 1: Enable the TPM 2.0 & Secure Boot Option If Disabled
How to Enable TPM Option in Windows 10,11?
Step 1: First of all, You Need to Restart the PC and Enter the Boot Menu By Pressing the Boot Key.
Boot Menu Keys will not be the same for all. It Will differ which usually depends on the companies of the computers or motherboards.
Boot Menu Option Keys – Esc, Del, F9, F10, and F12.
Step 2: On BIOS Settings Window, Now You need to look for security settings and Navigate to the Security Tab in BIOS Settings.
Step 3: Now You See the option to change the TPM status, So, Just Change TPM Device Status From Hidden To Available.
Step 4: By Default, the TPM State Will be Disabled, So you may need to Enable the TPM State.
Step 5: Just Save the Changes on BIOS Settings and Exit the Boot Menu.
*Important Note – You Cannot Find the Exact TPM Word in BIOS. Since AMD and Intel Use Different Terms for TPM.
For AMD Users – AMD fTPM
For Intel Users – Intel Platform Trust Technology (PTT)
How to Enable Secure Boot Option in Windows 10,11?
*Note- You Also Need to Enable the Secure Boot also for Installing Windows 11.
Step 1: First of all You Need to Restart the PC and Enter the Boot Menu By Pressing the Boot Key.
* Some of the Boot Keys are Esc, Del, F9, F10, and F12.
Step 2: Look for the Boot Option on BIOS Settings & Now You need to Navigate to the Boot Options in BIOS Settings.
Step 2: On the Boot Settings Window, You can See the Secure boot Option.
Step 3: Usually, Most of the time the Secure boot is Disabled, So You Need to Enable the Secure boot Option Manually.
Step 4: Now You Need to Ensure whether the TPM & Secure Boot is Enabled or Not. For that, You Need to Log in to Your PC and Check if it is Enabled or not.
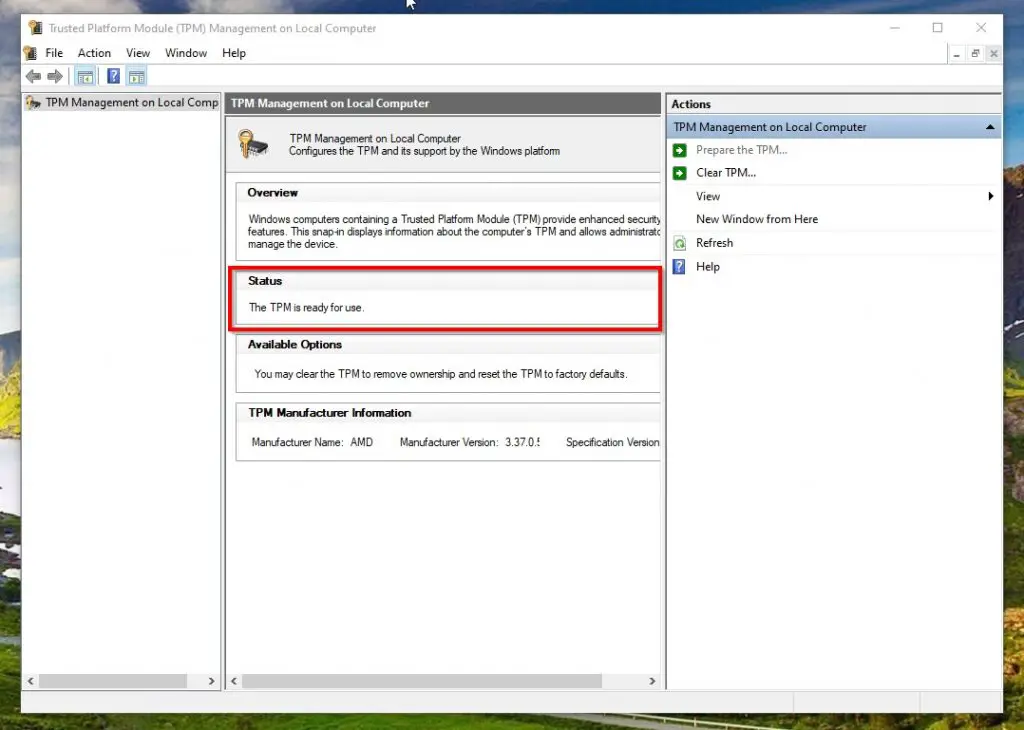
Step 5: In Order to check the TPM Feature, You Need to Type TPM in Windows Search Bar (or) Open the Run Program and Type tpm.msc and Hit Enter.
On TPM Management Program, You See the TPM Status, It Says “The TPM is ready to Use.”
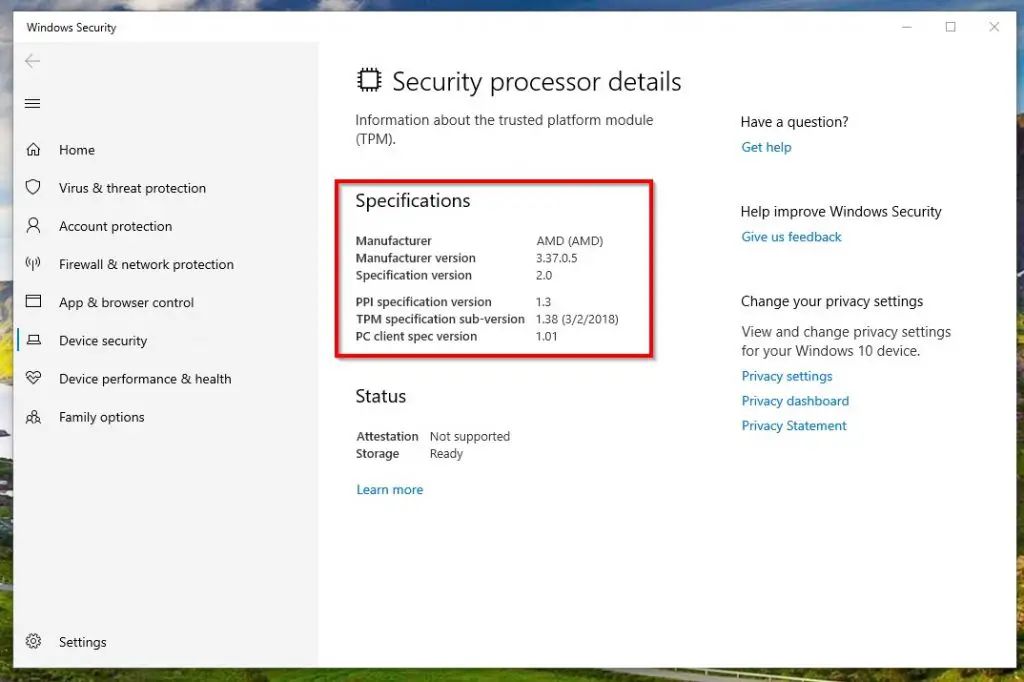
You Can Also Use the Security Processor Details from Device Security Settings to Check the TPM Status.
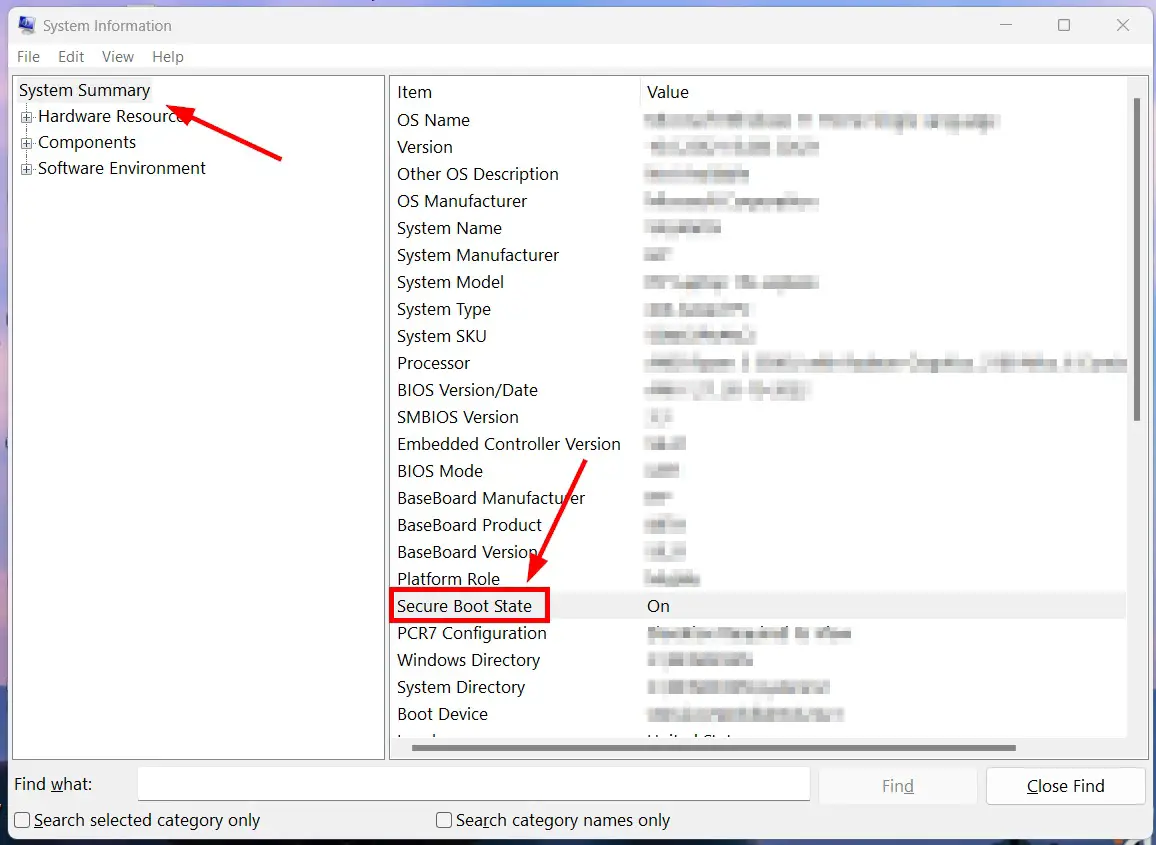
Step 6: To Check the Secure Boot Feature, You Need to Type System Information (or) msinfo32 in Windows Search Bar (or) Open the Run Program & Type msinfo32 & Hit Enter.
Step 7: On System Information Program, Click on the System Summary and Look for the Secure Boot State. If it is On then Secure Boot is Enabled Successfully on your System.
After Enabling TPM and Secure boot, Try Installing the Windows 11 OS.
If Still you cant install then your System Didn’t Meet the Minimum Requirements.For those Who Want to Install the Windows 11 on their Unsupported PC. You Can Follow the Method 2 – Bypassing Windows 11 System Requirements.
Method 2: Bypass Windows 11 TPM 2.0 and Secure Boot Using AveYo’s Media Creation Tool Github
Step 1: First of all, Goto AveYo’s Media Creation Tool Github Page Using the Link Given Below.
Link – AveYo’s Media Creation Tool
Step 2: On AveYo’s GitHub Page, You see the Source Code of Skip_TPM_Check_on_Dynamic_Update.cmd Which Will Bypass the System Requirements Automatically.
Step 3: Now Open Notepad and Copy Paste the Full Source Code and Save the file as Windows 11 Skip TPM Check.cmd
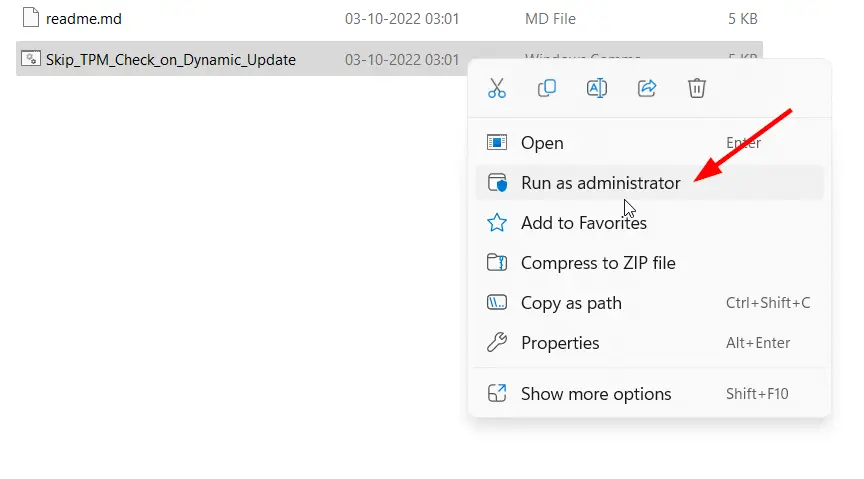
Step 4: Now Run the Windows 11 Skip TPM Check.cmd File and Press Yes If User Account Control Windows Prompts.
So, Now You Can see the message “Skip TPM on Dynamic Update is installed”.
If You Want to Remove this Script, then Run the Windows 11 Skip TPM Check.cmd file again to Remove it.
Method 3: Use the Windows 11 Upgrade Tool from GitHub to Bypass & Install Windows 11.
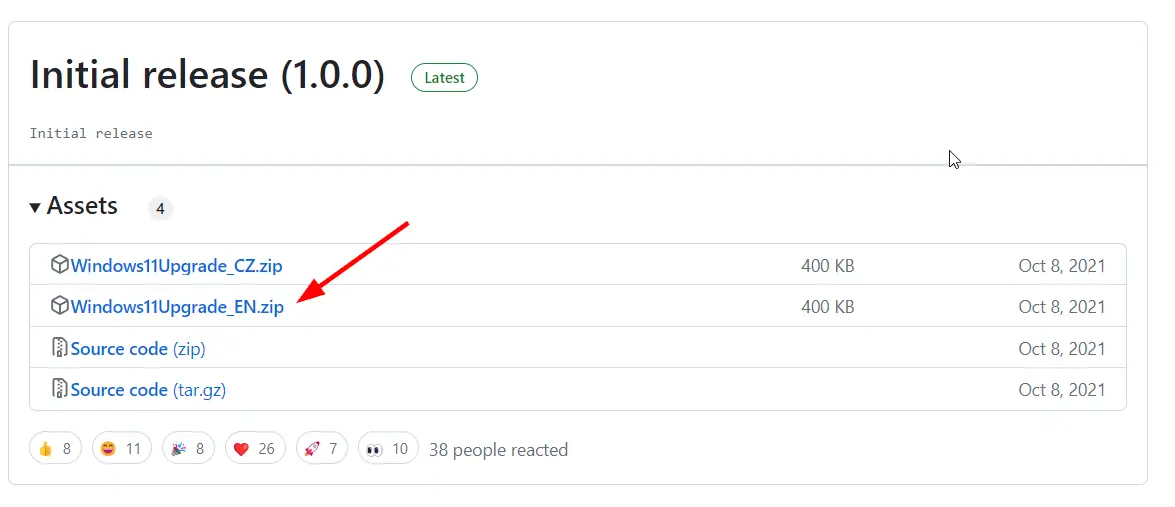
Step 1: First of all, Goto the Windows11UpgradeTool Official Github Page Using the Link Given Below.
Step 2: On the GitHub Page, You Need to Click on Windows11Upgrade_EN.zip File
to Download it into You Computer.
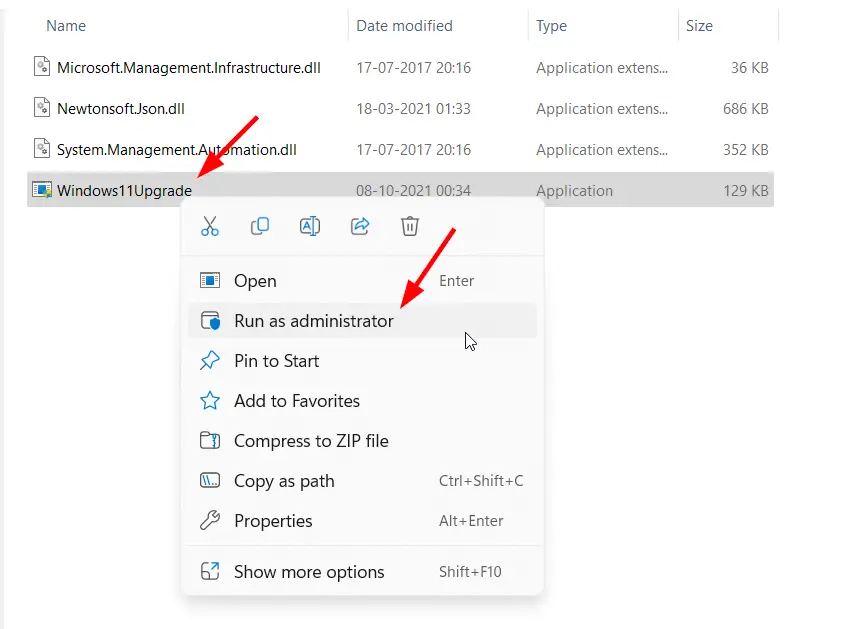
Step 3: After Downloading the Zip File, You Need to Extract the ZIP file. Now Open the Extracted Folder & Look for the Windows11Upgrade.exe and Right Click on it and Run it as Administrator.
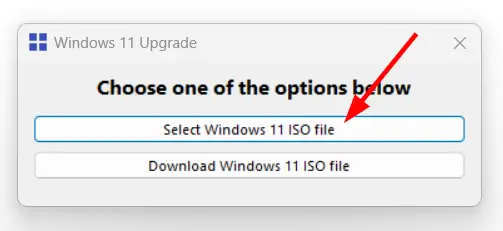
Now the Tool will ask you to choose any one of the options to Proceed.
The First Option is Select Windows 11 ISO File. You Can Select this Option If you Already Downloaded the Windows 11 ISO File.
The Second Option is Download Windows 11 ISO File. If You Don’t have a Windows 11 ISO File, You Can Use this Option to Download the ISO.
Step 4: So, If You’re Choosing the First Option then You Need to Select the Windows 11 ISO file that you have already downloaded.
Step 5: Now You Need to Select the System Language. Always Select the Same Language Which you are currently using on your PC.
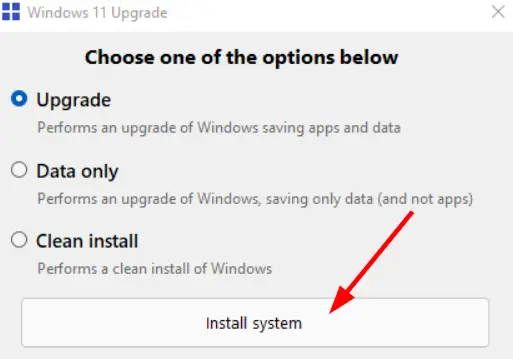
Now Again the Tool will ask you to choose any one of the options to Proceed.
1. Upgrade – Use this Option if you want to Upgrade from the Existing Windows 10 to Windows 11.(Saves Apps and Data)
2. Data Only – Use this option if you want to Upgrade from the Existing Windows 10 to Windows 11. (Saves only data & not apps)
3. Clean Install – Use this Option to Perform a Clean / Fresh Install of New Windows 11. (No Data and Apps Will be Saved)
Step 6: So, Choose Any One of the Options as Per Your Wish and Click on the Install System Button.
Now the Windows11UpgradeTool will Bypass the System Requirements and You will be able to Install Windows 11 on your computer easily.
That’s All About this Post. Give Your Reviews / Reactions about this Post and Leave Comments, Ask Your Doubts, We are here to Help You!


