
Hi Guys, Today I am Going to tell you How To Reset Winsock In Windows 7,8,8.1,10 &11?
Check Out This: How to Fix “Some of these settings are hidden or managed by your organization” in Windows 10 & 11?
If You’re Looking for “How To Perform a Winsock Reset In Windows 7,8,8.1,10 &11?” (or) “How to do Winsock Reset in Windows 7,8,8.1,10 &11?”.You are at the Right Place to Get Your Answers & Solve the Issue/Error.

Winsock is an Application Programming Interface (API) that provides communication between Windows Network Applications and Network services, especially Transmission Control Protocol/Internet Protocol (TCP/IP). Winsock is generally based on the Berkeley sockets API. It provides an interface between a Windows TCP/IP client application like FTP clients, browsers, and the TCP/IP protocol stack. Usually, the Winsock program is included as a part of the Windows operating system. A Winsock is also available for Mac OS. Winsock plays a major role when it comes to networking. On Windows Operating System, It allows programs and applications to access the internet through Transmission Control Protocol/Internet Protocol (TCP/IP). Sometimes we can see internet issues related to Winsock. If you are not able to view any web pages even if you have a proper Wi-Fi connection, then you need to reset the Winsock to fix the issue.
These issues may happen randomly after a long time of usage (or) get corrupted due to malware. If the Winsock gets corrupted then the Programs and Applications won’t able to connect to the internet (or) you may specific error messages regarding sockets. It can also appear If you’re using a Virtual Private Network (VPN) and a Firewall program. You Need to Reset the Winsock Whenever you’re seeing network-related errors (or) DNS lookup issues. Resetting the Winsock Won’t cause any issues normally but don’t do that frequently. Whenever You Reset the Winsock, It will Undo/Clear the changes made in the Winsock configurations. If You’re Facing any network-related issues then resetting the Winsock would be the easiest fix. If You want to Reset the Winsock just follow the steps given below.
Let’s See About it.
Steps For How To Reset Winsock In Windows 7,8,8.1,10 &11?
Method 1: Using the Command prompt
Step 1: Go to Start (or) Windows Search & Type Command Prompt and Run it as Administrator.
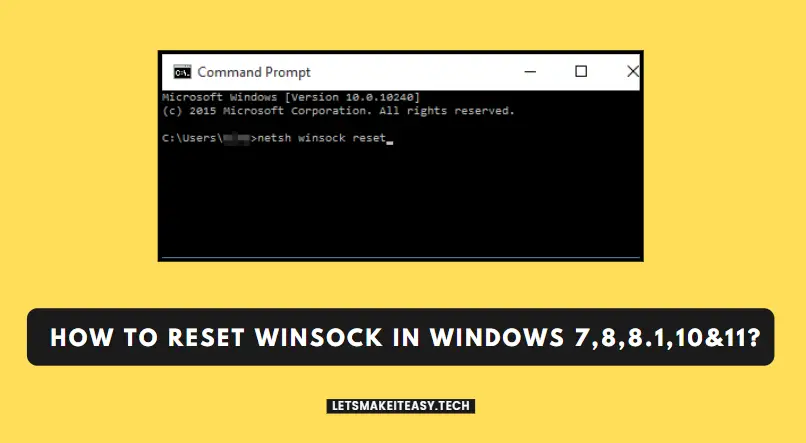
Step 2: After Opening Elevated Command Prompt, Now You Just Need to Type the Following Command given below and Press Enter.
netsh winsock reset
netsh winsock reset
Now Restart your PC and Check again whether the problem is gone or not.
Method 2: Use FixWin 10 Tool (Created By The Windows Club)
Step 1: Download FixWin 10 Tool from the Official Website or Get it from the Below Link.
FixWin 10 Tool – https://www.thewindowsclub.com/downloads/FixWin10.zip
(Or)
Step 2: Open the Tool, Navigate to Additional Fixes and Select the Quick Fixes Tab and Click the Reset Winsock Button.
Wait For The Process to Complete.
Method 3: Using the Network troubleshooter
Step 1: Click the Start button, then type settings. Select Settings > System > Troubleshoot > Other troubleshooters.
Step 2: Under Other Troubleshooters, select Network Adapter > Run.
Step 3: Follow the steps in the troubleshooter and see if that fixes the problem.
That’s It. You’re Done. Have a Nice Day.
Give Your Reviews / Reactions, Leave Comments, and Ask Your Doubts.
We are here to Help You!