
Hi Guys, Today I am Going to Show You How to Configure Jio Fiber Router? | Reliance Jio Fiber Router JCO4032 Settings [ Updated ]
Check Out This:
What is Jio Fiber Router?
JioFiber is the High Speed Internet Technology Developed For Future Generations.
Jio Fiber Provides the Best broadband experience to User to Watch,Surf,Play.
Jio Fiber gives you an Ultra speed Internet up to 1Gbps and Give access to Jio & other Premium OTT Apps which depends on the Plan You Choose.


Steps For How to Configure Jio Fiber Router? | How to Install Jio Giga Fiber at Home?
Step 1: Go to Your Browser and Type the Following IP Address – 192.168.29.1 And Press Enter.
IP Address  - 192.168.29.1
User Name   - admin
Password    - Jiocentrum
Step 2 : Now Enter the Default Login Details For User Name – admin and For Password – Jiocentrum.
If Jiocentrum Password Not Works for the First time ( In Some Cases ) , Try to Contact the Jio Operator or Jio Area Level Manager.
Step 3: Now You’ll Be Asked to Change the Password For Admin and Guest Accounts.
Step 4: Now After Changing the Passwords Now again Login to the Admin Panel with new Password.

*Note – There is No Need For any Configurations For Jio Fiber Routers. It is Fully Configured By Default.
If it is not Configured or if you’ve Mistakenly Reset it don’t worry just Follow the Steps Given Below
Step 5: Goto Network Tab and Navigate to LAN Section and Enter the Details Given in this Screenshot.
![How to Configure Jio Fiber Router? | Reliance Jio Fiber Router JCO4032 Settings [ Updated ]](/wp-content/uploads/2020/09/2020-07-29-00_47_42-Greenshot.jpg "How to Configure Jio Fiber Router? | Reliance Jio Fiber Router JCO4032 Settings [ Updated ]")
Step 6: Navigate to LAN IPv6 Configuration and Enter these Values Given in the Below Screenshot and Click Save.
![How to Configure Jio Fiber Router? | Reliance Jio Fiber Router JCO4032 Settings [ Updated ]](/wp-content/uploads/2020/09/2020-07-29-00_48_06-Greenshot.jpg "How to Configure Jio Fiber Router? | Reliance Jio Fiber Router JCO4032 Settings [ Updated ]")
Step 7 : Now Goto IPv6 Section and Select Ipv6/IPv4 Mode and Click Save.
![How to Configure Jio Fiber Router? | Reliance Jio Fiber Router JCO4032 Settings [ Updated ]](/wp-content/uploads/2020/09/2020-08-01-23_35_55-Greenshot.jpg "How to Configure Jio Fiber Router? | Reliance Jio Fiber Router JCO4032 Settings [ Updated ]")
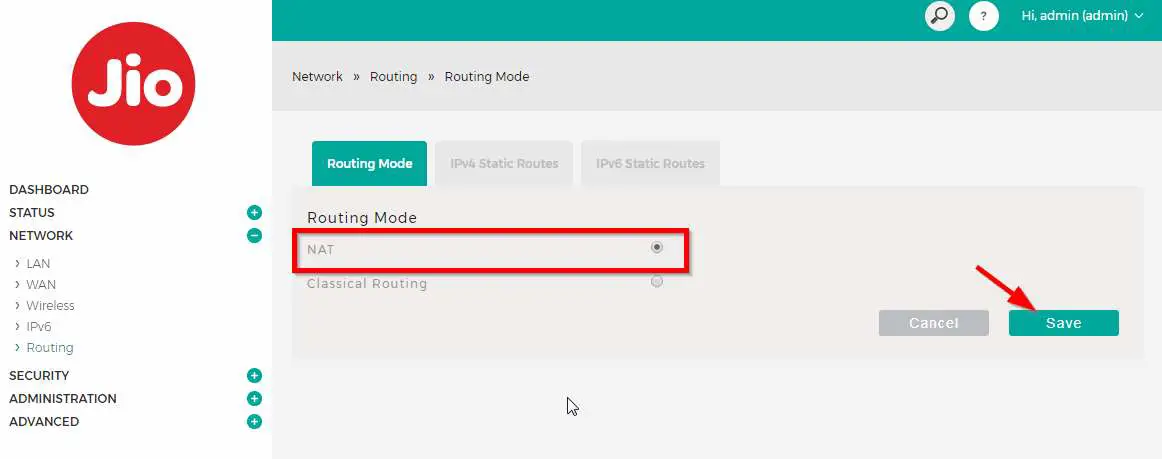
Step 8 : Now Goto Routing Section and Select NAT and Click Save.
Step 9 : Now Navigate to IPv4 Section and Click Add New and Enter the Values As Shown in the Below Screenshot.
![How to Configure Jio Fiber Router? | Reliance Jio Fiber Router JCO4032 Settings [ Updated ]](/wp-content/uploads/2020/09/2020-08-01-23_39_06-Greenshot.jpg "How to Configure Jio Fiber Router? | Reliance Jio Fiber Router JCO4032 Settings [ Updated ]")
Step 10 : Now Navigate to IPv4 Section and Click Add New and Enter the Values As Shown in the Below Screenshot and Click Save.
*Most Important Part is Here : How to change JioFiber Router (WiFi/SSID) Password ?
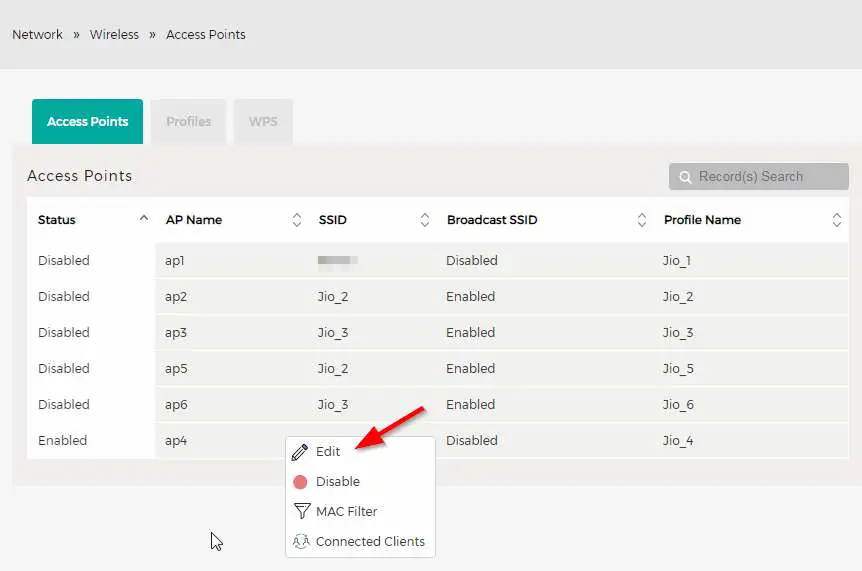
Step 11 : Now Navigate to Wireless Section and Navigate to Profiles Tab.

Step 12 : Now Right Click on the Profile Which You Wanted to Change and Click Edit.
Step 13 : Now Change the SSID Name If You Want and Also Select the Security Type as WPA2 and Encryption as CCMP and Authentication as PSK.
![How to Configure Jio Fiber Router? | Reliance Jio Fiber Router JCO4032 Settings [ Updated ]](/wp-content/uploads/2020/09/2020-08-01-23_47_45-Greenshot.jpg "How to Configure Jio Fiber Router? | Reliance Jio Fiber Router JCO4032 Settings [ Updated ]")
Step 14 : Now Change the Password Whatever You Want and Turn Off The Broadcast SSID for Further Security Purposes.
*IMPORTANT NOTE – ALWAYS CHOOSE PASSWORDS WITH STRONG COMBINATIONS [ Password Length Between 9-16 , Capital Letters , Symbols , Numbers ]
Example – Letsmakeiteasy2020*
That’s It ! You’re Done Man !
@@@ Leave Comments !!! @@@
***


I forgot my jco4032 gateway password, can I do a hard reset without losing other settings
Why Jio fiber router not supporting custom dns.changing dns not working can you figure it out how to use it.